Ah, the digital wanderer embarks on a quest to merge the realms of Rackspace Email and their trusty iPhone! A tale as old as smart devices, where the hero, that’s you, dear reader, seeks to harness the power of professional communication in the palm of their hand. But alas! However, the path is often shrouded in the mystic veils of technical jargon and perplexing steps. How to set up Rackspace email on iPhone? Fear not, for this guide shall be your beacon of knowledge. Hence, illuminating the way with simple steps, ensuring your messages sail smoothly through the digital ether.
To set up Rackspace Email on your iPhone, navigate to “Settings” > “Mail” > “Add Account” > “Other” > “Add Mail Account”. For incoming and outgoing mail servers, use “secure.emailsrvr.com”, ensuring SSL is on, and server port is set to 993 for IMAP. Hence, authenticate using your full Rackspace email address and password, and voila, your emails are ready to be accessed on the go!
Together, let’s navigate through the enigmatic seas of email setup. Hence, ensuring your Rackspace messages find safe harbor within your iPhone, ready to be accessed at a moment’s notice, wherever your adventures may lead you! How to set up Rackspace email on iPhone? Keep reading to learn in detail.
See Also: Windows Live Mail Won’t Open | 8 Easy Fixes
Contents
- 1 Understanding Rackspace Email
- 2 Prerequisites For Email Setup
- 3 Step-By-Step Guide To Setting Up Rackspace Email On iPhone
- 4 Troubleshooting Common Issues
- 5 Tips For Managing Your Rackspace Email On iPhone
- 6 FAQs
- 6.1 How do I set up Rackspace Email on my iPhone?
- 6.2 Can I access Rackspace Email without setting it up on my iPhone?
- 6.3 Is Rackspace Email compatible with all iPhone models?
- 6.4 How secure is Rackspace Email when accessed from an iPhone?
- 6.5 Can I manage multiple Rackspace Email accounts on my iPhone?
- 7 Conclusion
Understanding Rackspace Email
Ahoy, digital traveler! Let’s embark on a journey through the mystical lands of Rackspace Email, shall we? Imagine a realm where your messages, both mystical and mundane, are guarded by the robust fortresses of Rackspace mobile app. A place where your digital letters are not merely sent and received but are cherished, protected, and ushered securely through the vast cyberspace. Rackspace Email, dear reader, is not merely a messenger.
Nay, it is a steadfast courier in the digital realm, offering you a secure, reliable, and utterly enchanting platform. Hence, it is available to send, receive, and store your precious communications. With the ability to wield robust spam protection and create mailboxes. It can hold up to 25GB. Hence, it’s a treasure trove for every digital wanderer seeking organized and secure email management.
And the magic doesn’t end there! With Rackspace, you can access your messages from wherever your adventures take you, be it through a webmail interface. Hence, it is as our journey today will explore, through the mystical device known to mortals as the iPhone. Ready to delve deeper and unravel the secrets of connecting these two powerful entities? Onward, to seamless connectivity and communication!
Prerequisites For Email Setup
Ah, brave digital wanderer, before we delve into the intricate tapestry of email setup, let’s arm ourselves with the essential tools and knowledge, shall we? First and foremost, your Rackspace mobile Email address and password shall be the key to unlock the gates of connectivity. Guard them well! Next, ensure your mystical device, the iPhone. Hence, it is in the robust connectivity of the internet, for without it, our journey is incomplete.
And fear not, for should you find yourself entwined in the vines of confusion. Therefore, this guide shall light the path, ensuring a smooth and successful journey through the realms of email setup. With our prerequisites secured and spirit prepared, let’s embark on this digital adventure. Hence, ensuring your Rackspace Email finds a cozy dwelling within your iPhone!
See Also: 5 Methods To Fix Messages App Keeps Crashing On Android
Step-By-Step Guide To Setting Up Rackspace Email On iPhone
How to set up Rackspace email on iPhone? Embark with me, dear reader, on a step-by-step adventure through the digital forests of email setup. Hence, we shall guide your Rackspace Email to its new dwelling within your iPhone!
Begin The Quest
First, navigate to the mystical “Settings” on your iPhone, a cogwheel icon that harbors the secrets to device customization. Scroll down the parchment until you find “Mail,” the gateway to electronic correspondence. 
Tap “Accounts” and then “Add Account,” where we shall invoke the Rackspace Email into our device.
Enter The Domain Of Rackspace
Choose “Other” and select “Add Mail Account.” Here, inscribe your name, Rackspace Email address, and the secret password into the respective fields. Hence, the description shall be “Rackspace” to remind us of the realm from whence our digital messages travel.
Configure The Incoming Mail Server
In the incoming mail server domain, scribe “secure.emailsrvr.com” as the hostname. Your full Rackspace Email address and secret password shall be your credentials. 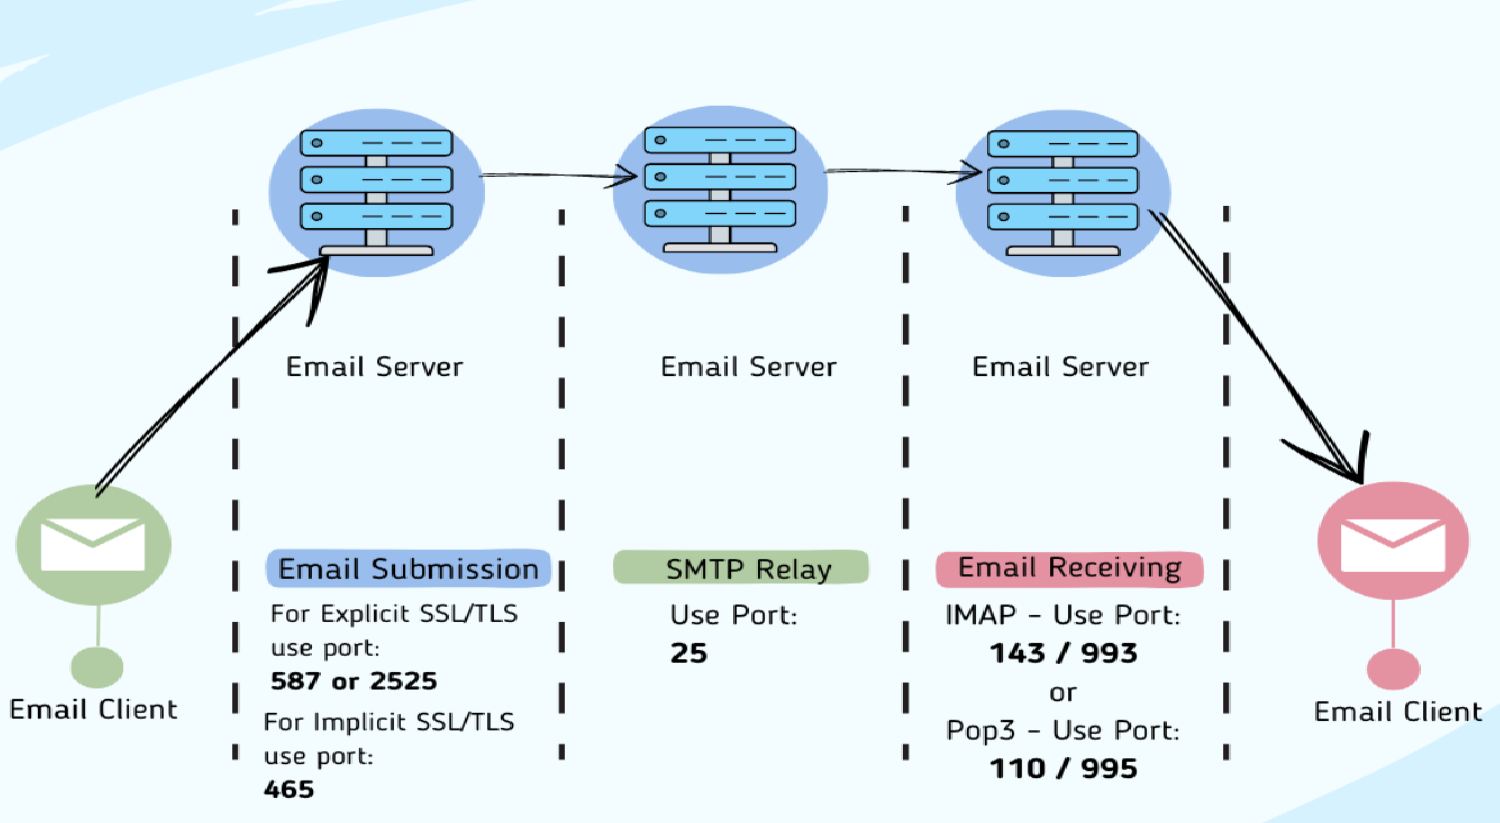
Ensure the activation of SSL, and the server port is set to “993” to ensure a secure passage for your messages through the IMAP protocol.
Configure The Outgoing Mail Server
For the outgoing mail server, the hostname shall again be “secure.emailsrvr.com.” Use the same Rackspace email setup iPhone address and password to authenticate the server. SSL shall remains activate, and the server port is “587,” ensuring the dispatching of your messages securely into the digital ether.
Verify And Finalize The Setup
Tap “Save” and select your newly added Rackspace account. Navigate to “Outgoing Mail Server” and ensure “Use SSL” is activated. Tap “Done” to verify the settings. 
Huzzah! Your Rackspace Email should now harmoniously synchronize with your iPhone, ready to send and receive messages from the digital realm!
With your Rackspace Email now nestled comfortably within your iPhone, you are ready to embark on countless adventures in communication, with the digital world at your fingertips!
See Also: How Can You Fix Outlook Error 0x800CCC0E?
Troubleshooting Common Issues
Ah, dear digital adventurer, even the most seasoned travelers in the realms of technology occasionally find themselves ensnared in the perplexing webs of technical quandaries! How to set up Rackspace email on iPhone? Fear not, for this section shall be your trusty guide through the common tribulations encountering on our journey of Rackspace Email setup on the iPhone.
- Cannot Verify Server Identity: Should you encounter this mystifying message, fret not! Navigate to “Settings” > “Mail” > Your Rackspace Account > “Account” > “Advanced” and ensure to activate “Use SSL” and the “Server Port” is set to 993. Hence, this shall assure a secure, encrypted connection to the Rackspace servers, banishing the perplexing message to the digital abyss.
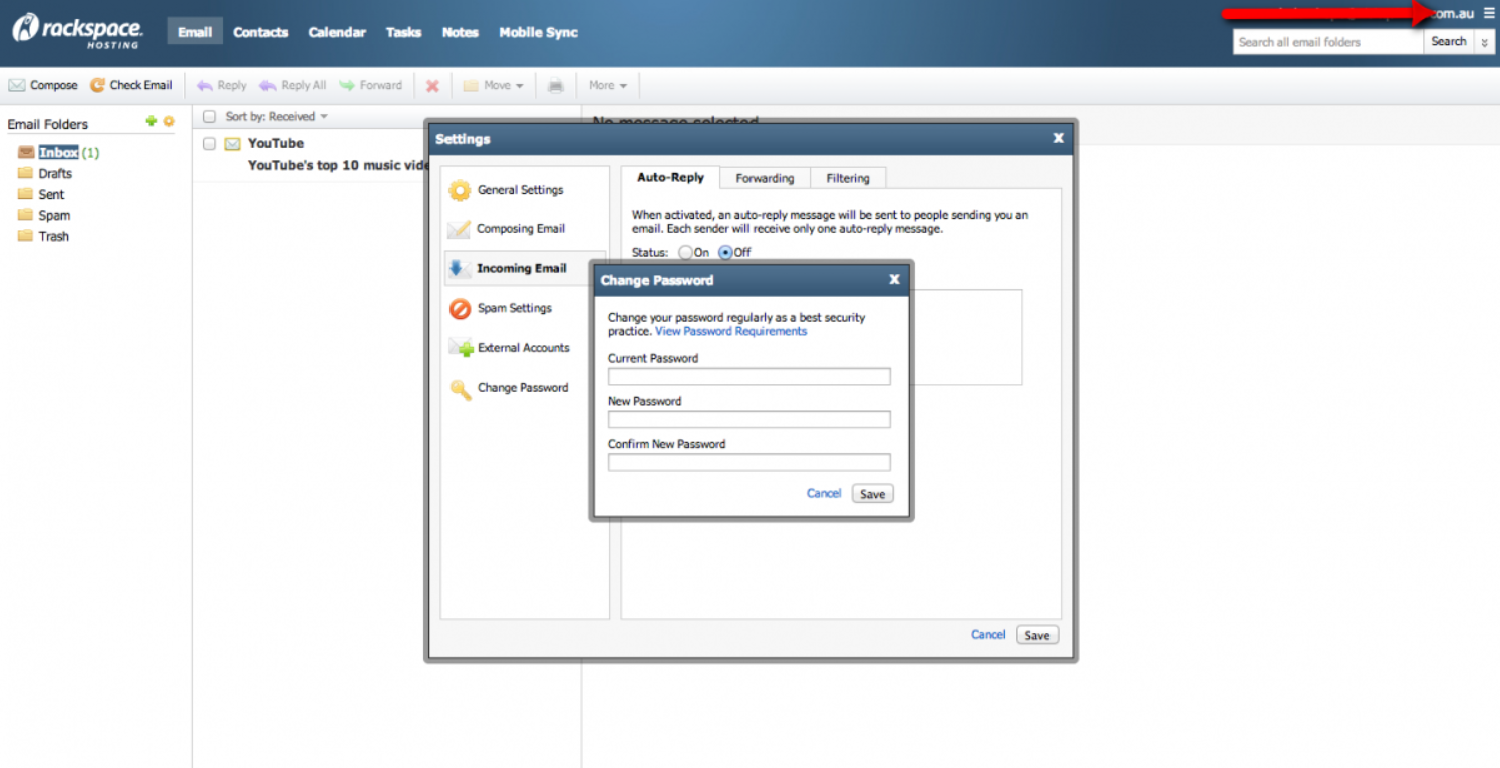
- Password Incorrect: A message declaring an incorrect password can often be a mere miscommunication in the digital realms. Re-enter your secret code cautiously, ensure to inscribe each character accurately. Hence, if the issue persists, voyage to the Rackspace webmail portal to reset your password, ensuring you wield the correct key to access your digital messages.
- The Bewildering Absence Of Sent Or Received Messages: In the event that you are not sending and receiving messages. Hence, ensuring your device baths in the robust connectivity of the internet. Revisit the incoming and outgoing server settings, ensuring the hostname is “secure.emailsrvr.com” and the ports are set to 993 and 587, respectively. Hence, a swift device restart may also coax the messages into flowing smoothly once more.
And thus, dear reader, with these solutions in our arsenal, we shall navigate through the common pitfalls with ease and grace! Should further issues arise, remember. Hence, patience, persistence, and a dash of troubleshooting magic shall light our path through the digital forests!
Tips For Managing Your Rackspace Email On iPhone
How to add Rackspace email to iPhone? Ah, splendid! With our Rackspace Email now nestled within the iPhone, let’s embark on a mini-quest to master the art of email management, shall we?
- Organize Thy Inbox: Utilize folders and categories to sort your digital messages, ensuring each correspondence finds its rightful place within your inbox. Navigate to “Mailboxes” and utilize the “Edit” option to conjure new folders, guiding your messages to their designated realms.
- Harness The Power Of Notifications: Customize your notifications. Within “Settings” > “Mail” > “Notifications,” you can conjure alerts for new messages, ensuring you’re ever-ready to respond to incoming digital missives.
- The Art Of Email Signature: Craft a signature that automatically adorns your sent messages. Navigate to “Settings” > “Mail” > “Signature” and inscribe a closing that resonates with your digital persona. Hence, adding a personal touch to your electronic correspondences.
- Protecting Your Digital Realm: Regularly update your password and review security settings to safeguard your digital communications from nefarious entities.
And thus, with these tips, manage your Rackspace iPhone setup Email with prowess and finesse, ensuring a harmonious journey through the digital communication realms!
See Also: Why Can’t I Reply To A Specific Message On Instagram iPhone?
FAQs
How do I set up Rackspace Email on my iPhone?
Navigate to iPhone Settings > Mail > Add Account > Other > Add Mail Account. Enter your Rackspace Email details. Ensure SSL is on and use port 993 for incoming and 587 for outgoing servers.
Can I access Rackspace Email without setting it up on my iPhone?
Yes, you can access Rackspace Email via the webmail interface on your iPhone's browser by visiting webmail.rackspace.com and logging in with your email credentials.
Is Rackspace Email compatible with all iPhone models?
Yes, Rackspace Email can be set up on all iPhone models that support the Mail app, ensuring you can manage your emails on the go, regardless of your device model.
How secure is Rackspace Email when accessed from an iPhone?
Rackspace Email utilizes SSL encryption for both incoming and outgoing servers when set up on your iPhone, ensuring the secure transmission of your emails.
Can I manage multiple Rackspace Email accounts on my iPhone?
Absolutely! You can manage multiple Rackspace Email accounts by repeating the setup process for each account, ensuring all your correspondences are accessible in one place.
Conclusion
And so, dear digital traveler, our enchanting journey through the realms of Rackspace Email and iPhone intertwines, comes to a gentle close. How to set up Rackspace email on iPhone? We’ve navigated through the mystical forests of setup and battled common technical dragons. Hence, it unearths the secrets to managing our digital messages with grace and expertise.
May your correspondences flow effortlessly through the cyberspace, reaching their destinations with the magic we’ve woven together. Share your tales of digital communication below, and until our paths cross again, happy messaging!

Hello, I am McKenzie and I am totally obsessed with getting the best experience out of every device that I use. Hence, I started this blog to help others make the most of their devices and fix errors in a jiffy! :)